

Building an Angular CRUD App with a .NET API
Creating a CRUD (Create, Read, Update, Delete) application is a fundamental skill in web development. In this article, we'll guide you through the process of building a CRUD app using Angular for the front end and a .NET API for the back end. This combination provides a powerful and efficient way to develop full-stack web applications.
Prerequisites
- Node.js
- .NET 8
- MySQL
Setup Angular project
Install Angular 18 and create a new project with the following command.
npm install -g @angular/cli@18.0.0
ng new view --minimal --routing --style css --no-standalone --ssr=false
Angular project structure
└─ src
   ├─ app
   │  ├─ app-routing.module.ts
   │  ├─ app.component.ts
   │  ├─ app.interceptor.ts
   │  ├─ app.module.ts
   │  └─ components
   │     └─ product
   │        ├─ Create.component.ts
   │        ├─ Delete.component.ts
   │        ├─ Detail.component.ts
   │        ├─ Edit.component.ts
   │        ├─ Index.component.ts
   │        └─ Product.service.ts
   ├─ index.html
   ├─ main.ts
   └─ styles.css
*This project structure will display only the files and folders that we plan to create or modify.
Angular Project files
main.ts
import { enableProdMode } from '@angular/core'
import { platformBrowserDynamic } from '@angular/platform-browser-dynamic'

import { AppModule } from './app/app.module'

platformBrowserDynamic().bootstrapModule(AppModule).catch(e => console.error(e))
This main.ts file initializes an Angular application by bootstrapping the AppModule using the platformBrowserDynamic function. It sets up the application to run in the browser and handles any errors that occur during the bootstrapping process.
app.module.ts
import { NgModule } from '@angular/core'
import { BrowserModule } from '@angular/platform-browser'
import { FormsModule } from '@angular/forms'
import { HttpClientModule, HTTP_INTERCEPTORS } from '@angular/common/http'
import { AppRoutingModule } from './app-routing.module'
import { AppComponent } from './app.component'
import { AppInterceptor } from './app.interceptor'

import { ProductIndex } from './components/product/Index.component'
import { ProductCreate } from './components/product/Create.component'
import { ProductDetail } from './components/product/Detail.component'
import { ProductEdit } from './components/product/Edit.component'
import { ProductDelete } from './components/product/Delete.component'

@NgModule({
  declarations: [
    AppComponent,
    ProductIndex,
    ProductCreate,
    ProductDetail,
    ProductEdit,
    ProductDelete,
  ],
  imports: [
    BrowserModule,
    AppRoutingModule,
    FormsModule,
    HttpClientModule
  ],
  providers: [
    { provide: HTTP_INTERCEPTORS, useClass: AppInterceptor, multi: true }
  ],
  bootstrap: [AppComponent]
})

export class AppModule { }
The AppModule is the main module of an Angular application. It imports core Angular modules and sets up routing with AppRoutingModule. The module declares various product-related components. It also registers AppInterceptor as an HTTP interceptor. The AppComponent is set as the bootstrap component, making it the entry point of the application.
app.component.ts
import { Component } from '@angular/core'

@Component({
  selector: 'app-root',
  template: `<router-outlet></router-outlet>`
})

export class AppComponent { }
The app.component.ts file defines the root component, AppComponent, which uses the <router-outlet>app-root selector and serves as the entry point for the Angular application.
app.interceptor.ts
import { Injectable } from '@angular/core';
import { HttpInterceptor } from '@angular/common/http';
import { HttpRequest, HttpErrorResponse } from '@angular/common/http'
import { Observable, throwError } from 'rxjs'
import { HttpHandler } from '@angular/common/http'
import { HttpEvent } from '@angular/common/http'

@Injectable({
  providedIn: 'root'
})

export class AppInterceptor implements HttpInterceptor {

  baseURL = 'http://localhost:5122/api'

  intercept(request: HttpRequest<any>, next: HttpHandler): Observable<HttpEvent<any>> {
    return next.handle(request.clone({
      url: this.baseURL + request.url,
    }))
  }
}
The AppInterceptor class is an Angular HTTP interceptor that appends a configurable baseURL to all outgoing HTTP request URLs before they are sent to the server. This allows the application to centralize and easily manage the base API endpoint.
app-routing.module.ts
import { NgModule } from '@angular/core'
import { RouterModule, Routes } from '@angular/router'
import { ProductIndex } from './components/product/Index.component'
import { ProductCreate } from './components/product/Create.component'
import { ProductDetail } from './components/product/Detail.component'
import { ProductEdit } from './components/product/Edit.component'
import { ProductDelete } from './components/product/Delete.component'

const routes: Routes = [
  { path: '', redirectTo: 'product', pathMatch: 'full' },
  { path: 'product', component: ProductIndex },
  { path: 'product/create', component: ProductCreate },
  { path: 'product/:id', component: ProductDetail },
  { path: 'product/edit/:id', component: ProductEdit },
  { path: 'product/delete/:id', component: ProductDelete }
]

@NgModule({
  imports: [RouterModule.forRoot(routes)],
  exports: [RouterModule]
})

export class AppRoutingModule { }
The AppRoutingModule sets up routing for an Angular application, including product-related paths for listing, creating, viewing, editing, and deleting products. It also includes a route that redirects from the root path "/" to the product listing page "/product".
Create.component.ts
import { Component } from '@angular/core'
import { ActivatedRoute, Router } from '@angular/router'
import { ProductService } from './Product.service'

@Component({
  selector: 'product-create',
  template: `
    <div class="container">
      <div class="row">
        <div class="col">
          <form ngNativeValidate method="post" (submit)="create()">
            <div class="row">
              <div class="mb-3 col-md-6 col-lg-4">
                <label class="form-label" for="product_name">Name</label>
                <input id="product_name" name="name" class="form-control" [(ngModel)]="product.name" maxlength="50" />
                <span *ngIf="errors.name" class="text-danger">{{errors.name}}</span>
              </div>
              <div class="mb-3 col-md-6 col-lg-4">
                <label class="form-label" for="product_price">Price</label>
                <input id="product_price" name="price" class="form-control" [(ngModel)]="product.price" type="number" />
                <span *ngIf="errors.price" class="text-danger">{{errors.price}}</span>
              </div>
              <div class="col-12">
                <a class="btn btn-secondary" routerLink="/product">Cancel</a>
                <button class="btn btn-primary">Submit</button>
              </div>
            </div>
          </form>
        </div>
      </div>
    </div>`
})
export class ProductCreate {

  product?: any = {}
  errors?: any = {}
  constructor(private router: Router, private route: ActivatedRoute, private ProductService: ProductService) { }

  create() {
    this.ProductService.create(this.product).subscribe(() => {
      this.router.navigateByUrl('/product')
    }, (e) => {
      alert(e.error)
    })
  }
}
The ProductCreate component provides a form for creating a new product, binding input fields for name and price to a product object. On submission, it calls ProductService to create the product and navigates back to the product list. Validation errors are displayed next to the corresponding fields, and any creation errors trigger an alert.
Delete.component.ts
import { Component } from '@angular/core'
import { ActivatedRoute, Router } from '@angular/router'
import { ProductService } from './Product.service'

@Component({
  selector: 'product-delete',
  template: `
    <div class="container">
      <div class="row">
        <div class="col">
          <form ngNativeValidate method="post" (submit)="this.delete()">
            <div class="row">
              <div class="mb-3 col-md-6 col-lg-4">
                <label class="form-label" for="product_id">Id</label>
                <input readonly id="product_id" name="id" class="form-control" value="{{product.id}}" type="number" required />
              </div>
              <div class="mb-3 col-md-6 col-lg-4">
                <label class="form-label" for="product_name">Name</label>
                <input readonly id="product_name" name="name" class="form-control" value="{{product.name}}" maxlength="50" />
              </div>
              <div class="mb-3 col-md-6 col-lg-4">
                <label class="form-label" for="product_price">Price</label>
                <input readonly id="product_price" name="price" class="form-control" value="{{product.price}}" type="number" />
              </div>
              <div class="col-12">
                <a class="btn btn-secondary" routerLink="/product">Cancel</a>
                <button class="btn btn-danger">Delete</button>
              </div>
            </div>
          </form>
        </div>
      </div>
    </div>`
})
export class ProductDelete {

  product?: any = {}
  constructor(private router: Router, private route: ActivatedRoute, private ProductService: ProductService) { }

  ngOnInit() {
    this.get()
  }

  get() {
    return this.ProductService.delete(this.route.snapshot.params['id']).subscribe(data => {
      this.product = data
    }, e => {
      alert(e.error)
    })
  }

  delete() {
    this.ProductService.delete(this.route.snapshot.params['id'], this.product).subscribe(() => {
      this.router.navigateByUrl('/product')
    }, (e) => {
      alert(e.error)
    })
  }
}
The ProductDelete component in Delete.component.ts is an Angular component that handles the deletion of a product. It displays a form with read-only fields showing the product's details (ID, name, and price). When the component initializes, it fetches the product details using the product ID from the route. On form submission, the delete() method calls ProductService to delete the product and then redirects to the product list. If there's an error during deletion, an alert is shown.
Detail.component.ts
import { Component } from '@angular/core'
import { ActivatedRoute } from '@angular/router'
import { ProductService } from './Product.service'

@Component({
  selector: 'product-detail',
  template: `
    <div class="container">
      <div class="row">
        <div class="col">
          <form ngNativeValidate method="post">
            <div class="row">
              <div class="mb-3 col-md-6 col-lg-4">
                <label class="form-label" for="product_id">Id</label>
                <input readonly id="product_id" name="id" class="form-control" value="{{product.id}}" type="number" required />
              </div>
              <div class="mb-3 col-md-6 col-lg-4">
                <label class="form-label" for="product_name">Name</label>
                <input readonly id="product_name" name="name" class="form-control" value="{{product.name}}" maxlength="50" />
              </div>
              <div class="mb-3 col-md-6 col-lg-4">
                <label class="form-label" for="product_price">Price</label>
                <input readonly id="product_price" name="price" class="form-control" value="{{product.price}}" type="number" />
              </div>
              <div class="col-12">
                <a class="btn btn-secondary" routerLink="/product">Back</a>
                <a class="btn btn-primary" routerLink="/product/edit/{{product.id}}">Edit</a>
              </div>
            </div>
          </form>
        </div>
      </div>
    </div>`
})
export class ProductDetail {

  product?: any = {}
  constructor(private route: ActivatedRoute, private ProductService: ProductService) { }

  ngOnInit() {
    this.get()
  }

  get() {
    return this.ProductService.get(this.route.snapshot.params['id']).subscribe(data => {
      this.product = data
    }, e => {
      alert(e.error)
    })
  }
}
The ProductDetail component displays the details of a specific product. It retrieves the product information based on the ID from the route and shows the product's ID, name, and price in read-only fields. The component provides "Back" and "Edit" buttons for navigation. The product details are fetched and displayed when the component initializes.
Edit.component.ts
import { Component } from '@angular/core'
import { ActivatedRoute, Router } from '@angular/router'
import { ProductService } from './Product.service'

@Component({
  selector: 'product-edit',
  template: `
    <div class="container">
      <div class="row">
        <div class="col">
          <form ngNativeValidate method="post" (submit)="edit()">
            <div class="row">
              <div class="mb-3 col-md-6 col-lg-4">
                <label class="form-label" for="product_id">Id</label>
                <input readonly id="product_id" name="id" class="form-control" [(ngModel)]="product.id" type="number" required />
                <span *ngIf="errors.id" class="text-danger">{{errors.id}}</span>
              </div>
              <div class="mb-3 col-md-6 col-lg-4">
                <label class="form-label" for="product_name">Name</label>
                <input id="product_name" name="name" class="form-control" [(ngModel)]="product.name" maxlength="50" />
                <span *ngIf="errors.name" class="text-danger">{{errors.name}}</span>
              </div>
              <div class="mb-3 col-md-6 col-lg-4">
                <label class="form-label" for="product_price">Price</label>
                <input id="product_price" name="price" class="form-control" [(ngModel)]="product.price" type="number" />
                <span *ngIf="errors.price" class="text-danger">{{errors.price}}</span>
              </div>
              <div class="col-12">
                <a class="btn btn-secondary" routerLink="/product">Cancel</a>
                <button class="btn btn-primary">Submit</button>
              </div>
            </div>
          </form>
        </div>
      </div>
    </div>`
})
export class ProductEdit {

  product?: any = {}
  errors?: any = {}
  constructor(private router: Router, private route: ActivatedRoute, private ProductService: ProductService) { }

  ngOnInit() {
    this.get()
  }

  get() {
    return this.ProductService.edit(this.route.snapshot.params['id']).subscribe(data => {
      this.product = data
    }, e => {
      alert(e.error)
    })
  }

  edit() {
    this.ProductService.edit(this.route.snapshot.params['id'], this.product).subscribe(() => {
      this.router.navigateByUrl('/product')
    }, (e) => {
      alert(e.error)
    })
  }
}
The ProductEdit component allows users to edit an existing product. It retrieves the product details using the product ID from the route and displays them in a form with editable fields for name and price. On form submission, it updates the product via ProductService and navigates back to the product list. Any errors during fetching or updating are shown as alerts, and validation errors are displayed next to the relevant fields.
Index.component.ts
import { Component } from '@angular/core'
import { Router, NavigationEnd } from '@angular/router'
import { ProductService } from './Product.service'

@Component({
  selector: 'product-index',
  template: `
    <div class="container">
      <div class="row">
        <div class="col">
          <table class="table table-striped table-hover">
            <thead>
              <tr>
                <th>Id</th>
                <th>Name</th>
                <th>Price</th>
                <th>Actions</th>
              </tr>
            </thead>
            <tbody>
              <tr *ngFor="let product of products">
                <td class="text-center">{{product.id}}</td>
                <td>{{product.name}}</td>
                <td class="text-center">{{product.price}}</td>
                <td class="text-center">
                  <a class="btn btn-secondary" routerLink="/product/{{product.id}}" title="View"><i class="fa fa-eye"></i></a>
                  <a class="btn btn-primary" routerLink="/product/edit/{{product.id}}" title="Edit"><i class="fa fa-pencil"></i></a>
                  <a class="btn btn-danger" routerLink="/product/delete/{{product.id}}" title="Delete"><i class="fa fa-times"></i></a>
                </td>
              </tr>
            </tbody>
          </table>
          <a class="btn btn-primary" routerLink="/product/create">Create</a>
        </div>
      </div>
    </div>`
})

export class ProductIndex {

  products?: any[]
  constructor(public router: Router, private ProductService: ProductService) { }

  ngOnInit() {
    this.get()
  }

  get() {
    this.ProductService.get().subscribe(data => {
      this.products = data
    }, e => {
      alert(e.error)
    })
  }
}
The ProductIndex component displays a list of products in a table format. It fetches the list of products from ProductService on initialization and shows each product's ID, name, and price, with action buttons for viewing, editing, and deleting each product. It also includes a button to navigate to the product creation page.
Product.service.ts
import { Injectable } from '@angular/core'
import { HttpClient } from '@angular/common/http'
import { Observable } from 'rxjs'

@Injectable({
  providedIn: 'root'
})

export class ProductService {

  constructor(private http: HttpClient) { }

  get(id?: any): Observable<any> {
    if (id) {
      return this.http.get(`/products/${id}`)
    }
    else {
      return this.http.get('/products' + location.search)
    }
  }

  create(data?: any): Observable<any> {
    if (data) {
      return this.http.post('/products', data)
    }
    else {
      return this.http.get('/products/create')
    }
  }

  edit(id: any, data?: any): Observable<any> {
    if (data) {
      return this.http.put(`/products/${id}`, data)
    }
    else {
      return this.http.get(`/products/${id}`)
    }
  }

  delete(id: any, data?: any): Observable<any> {
    if (data) {
      return this.http.delete(`/products/${id}`)
    }
    else {
      return this.http.get(`/products/${id}`)
    }
  }
}
The ProductService uses Angular's HttpClient to perform the relevant HTTP requests for product management. It provides methods to:
get(id?): Fetch product details by ID or a list of products if no ID is provided.create(data?): Create a new product ifdatais provided, otherwise fetch the create product page.edit(id, data?): Update a product by ID ifdatais provided, otherwise fetch product details for editing.delete(id, data?): Delete a product by ID ifdatais provided, otherwise fetch product details for confirmation.
styles.css
.container {
  margin-top: 2em;
}

.btn {
  margin-right: 0.25em;
}
The CSS adjusts the layout by adding space above the container and spacing out buttons horizontally.
index.html
<!DOCTYPE html>
<html lang="en">
<head>
  <meta charset="utf-8">
  <meta name="viewport" content="width=device-width,initial-scale=1">
  <link href="https://cdnjs.cloudflare.com/ajax/libs/bootstrap/5.3.3/css/bootstrap.min.css" rel="stylesheet">
  <link href="https://cdnjs.cloudflare.com/ajax/libs/font-awesome/6.5.0/css/all.min.css" rel="stylesheet">
</head>
<body>
  <app-root></app-root>
</body>
</html>
The HTML serves as the main entry point for an Angular application, including Bootstrap for styling, Font Awesome for icons, and <app-root>
Setup .NET API project
dotnet new webapi -o api -n AppCreate a testing database named "example" and execute the database.sql file to import the table and data.
.NET API Project structure
├─ Controllers
│  └─ ProductController.cs
├─ Models
│  ├─ DataContext.cs
│  └─ Product.cs
├─ Program.cs
├─ App.csproj
└─ appsettings.json
.NET API Project files
App.csproj
<Project Sdk="Microsoft.NET.Sdk.Web">
    <PropertyGroup>
        <TargetFramework>net8.0</TargetFramework>
        <ImplicitUsings>enable</ImplicitUsings>
    </PropertyGroup>
    <ItemGroup>
        <PackageReference Include="MySql.EntityFrameworkCore" Version="8.0.0" />
    </ItemGroup>
</Project>
This file is the .NET project configuration file, where we have added the MySql.EntityFrameworkCore package.
appsettings.json
{
    "Logging": {
        "LogLevel": {
            "Default": "Warning"
        }
    },
    "AllowedHosts": "*",
    "ConnectionStrings": {
        "Database": "server=localhost;port=3306;database=example;user id=root;password=;"
    }
}
This is the .NET application configuration file, which includes the database connection details.
Program.cs
using Microsoft.EntityFrameworkCore;

var builder = WebApplication.CreateBuilder(args);
builder.Services.AddControllers();
builder.Services.AddCors(options =>
{
    options.AddDefaultPolicy(policy => {
        policy.AllowAnyOrigin();
        policy.AllowAnyHeader();
        policy.AllowAnyMethod();
    });
});
builder.Services.AddDbContext<App.Models.DataContext>(options => options.UseMySQL(builder.Configuration.GetConnectionString("Database")));
var app = builder.Build();
app.UseCors();
app.UseRouting();
app.MapControllers();
app.Run();
The program.csfile is the main entry point for the .NET application. It configures services, sets up CORS, establishes a MySQL database context, and defines middleware for routing before starting the application.
DataContext.cs
using Microsoft.EntityFrameworkCore;

namespace App.Models
{
    public partial class DataContext : DbContext
    {
        public virtual DbSet<Product> Product { get; set; }

        public DataContext()
        {
        }

        public DataContext(DbContextOptions<DataContext> options) : base(options)
        {
        }

        protected override void OnConfiguring(DbContextOptionsBuilder optionsBuilder)
        {
        }

        protected override void OnModelCreating(ModelBuilder modelBuilder)
        {
            modelBuilder.Entity<Product>(entity =>
            {
                entity.ToTable("Product");
                entity.HasKey(e => e.Id);
                entity.Property(e => e.Id).HasColumnName("id");
                entity.Property(e => e.Name).HasColumnName("name").HasMaxLength(50).IsUnicode(false);
                entity.Property(e => e.Price).HasColumnName("price").HasColumnType("decimal(12,2)");
            });
        }
    }
}
DataContext.cs defines the Entity Framework Core context for the application, featuring a DbSetProduct table. It also sets up the Product entity with table mapping, primary key, and column details, including names, types, and constraints.
Product.cs
using System.ComponentModel.DataAnnotations;

namespace App.Models
{
    public class Product
    {
        [Key]
        public int Id { get; set; }
        public string Name { get; set; }
        public decimal Price { get; set; }
    }
}
Product.cs defines the model that maps to the database table named Product. It includes properties with annotations that specify how these properties correspond to the table's columns.
ProductController.cs
using Microsoft.EntityFrameworkCore;
using Microsoft.AspNetCore.Mvc;
using App.Models;

namespace App.Controllers
{
    public class ProductController : Controller
    {
        private readonly DataContext _context;

        public ProductController(DataContext context)
        {
            _context = context;
        }

        [HttpGet("api/products")]
        public async Task<IActionResult> Index()
        {
            var products = await _context.Product.ToListAsync();
            return Ok(products);
        }

        [HttpGet("api/products/{id}")]
        public async Task<IActionResult> Detail(int? id)
        {
            var product = await _context.Product.FirstOrDefaultAsync(e => e.Id == id);
            return Ok(product);
        }

        [HttpPost("api/products")]
        public async Task<IActionResult> Create([FromBody] Product model)
        {
            var product = new Product();
            product.Id = model.Id;
            product.Name = model.Name;
            product.Price = model.Price;
            _context.Add(product);
            await _context.SaveChangesAsync();
            return Ok(product);
        }

        [HttpPut("api/products/{id}")]
        public async Task<IActionResult> Update(int id, [FromBody] Product model)
        {
            var product = await _context.Product.FirstOrDefaultAsync(e => e.Id == id);
            product.Name = model.Name;
            product.Price = model.Price;
            await _context.SaveChangesAsync();
            return Ok(product);
        }

        [HttpDelete("api/products/{id}")]
        public async Task<IActionResult> Delete(int id)
        {
            var product = await _context.Product.FindAsync(id);
            _context.Product.Remove(product);
            await _context.SaveChangesAsync();
            return Ok();
        }
    }
}
The ProductController class provides API endpoints for managing Product entities. It uses DataContext to interact with the database:
Index(GET) retrieves all products.Detail(GET) fetches a specific product by ID.Create(POST) adds a new product.Update(PUT) modifies an existing product by ID.Delete(DELETE) removes a product by ID.
Run projects
Run Angular project
npm startRun .NET API project
dotnet runOpen the web browser and goto http://localhost:4200
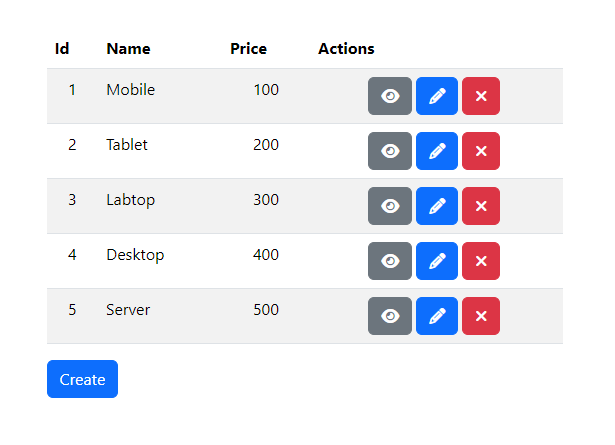
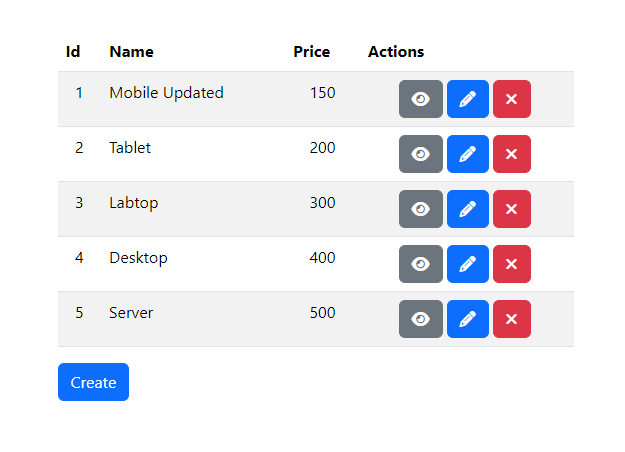
You will find this product list page.
Testing
Click the "View" button to see the product details page.
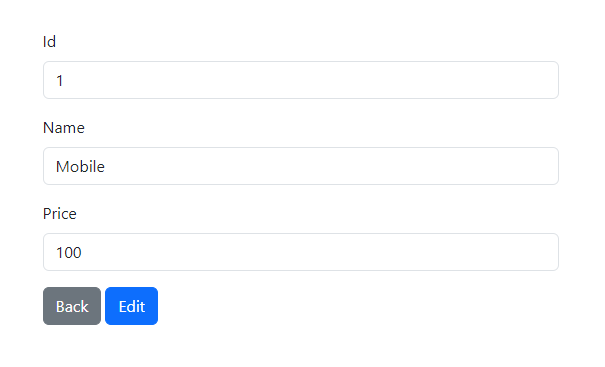
Click the "Edit" button to modify the product and update its details.
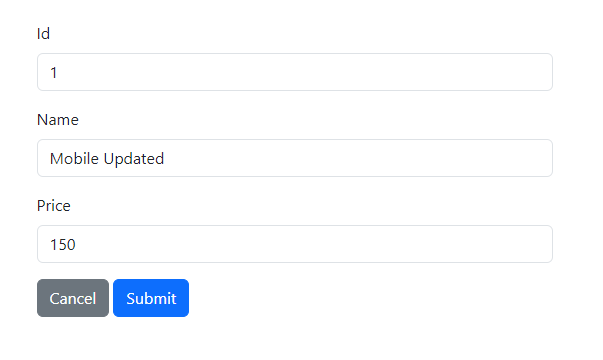
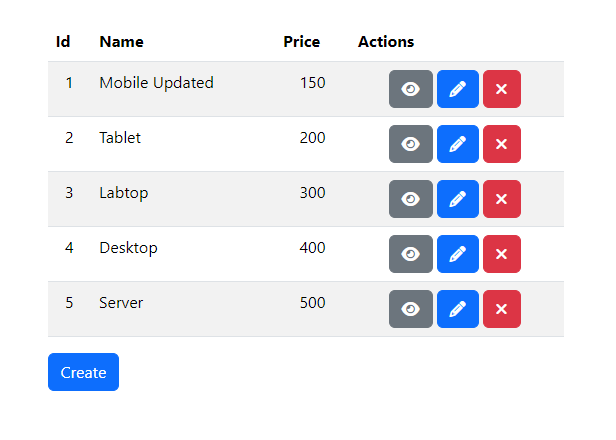
Click the "Submit" button to save the updated product details.
Click the "Create" button to add a new product and input its details.
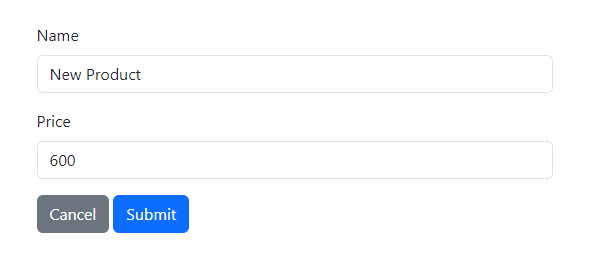
Click the "Submit" button to save the new product.

Click the "Delete" button to remove the previously created product.
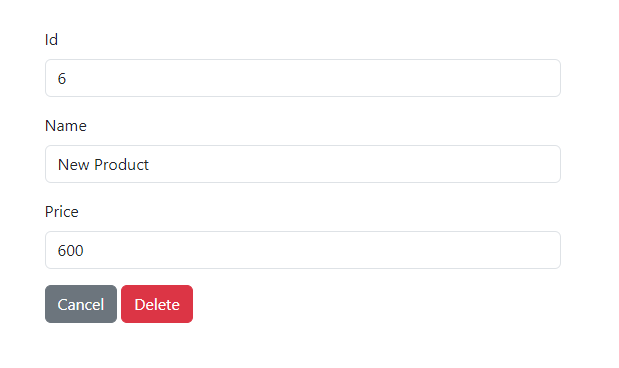
Click the "Delete" button to confirm the removal of this product.
Conclusion
In conclusion, we've learned how to create a basic Angular project that interacts with a .NET API as the backend. By mastering Angular components, views, and routing, alongside using Entity Framework for database operations, we've built a responsive front-end and a robust, scalable backend. This combination offers a solid foundation for modern web development.
Source code: https://github.com/stackpuz/Example-CRUD-Angular-18-dotnet-8
Create an Angular CRUD App in Minutes: https://stackpuz.com